How To Stop Facebook From Tracking You Online

How To Stop Facebook From Tracking You Online


Facebook tracks all the users activities online, the company says that they only use this data to display better targeted ads so that more people are likely to click on them which will ultimately make them a ton of money.

Well, being tracked doesn't sound that good, does it? So, we need to stop facebook from tracking our activities online and yes there is a possibility of telling facebook not to track you. This is what they call as 'Turn off interest based ads'.

By doing so, you are going to tell facebook that you don't want to be tracked and facebook as a social media giant respects its users privacy and has made the process of opting out of these so called interest based ads very easy than expected. All you need to do is a few clicks and you are good to go.

In this article, I am going to show you step-by-step exactly how to disable facebook's interest based ads.

Step #1


Login to your Facebook.

Step #2


Navigate to the top right corner and click on the downward arrow and select open the settings.


How To Stop Facebook From Tracking You Online


Step #3


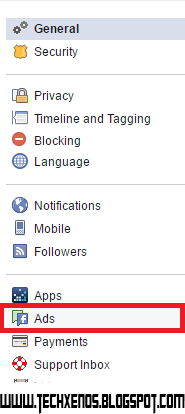
On the left side of the settings window, you will find a option called 'Ads', select open it.


How To Stop Facebook From Tracking You Online


Step #4


Click on the edit option beside the 'Ads based on my use of websites and apps'. Now, select the off/no option and hit the save button.


How To Stop Facebook From Tracking You Online


That's it! You have now successfully opted out of facebook tracking you online.

If you did happen to like the content and found it informative, then do share it with your find and family and help them also stay safer online.

If you have any problems regarding the procedure explained above or any other questions related to the tech community then do comment down below and I will surely answer all your questions.

How To Optimize Blogger Images For Better SEO

How To Optimize Blogger Images For Better SEO


Images play a very important role in getting your blog or website noticed. But, there are two major parts of using images to improve your website, one being the image itself which is helpful in attracting audience by using a attractive image and the second one is the ALT text of the images, this is not the one which the users see, but the information the search engines use to rank your images in the image search.

Optimising images for SEO is nothing but using ALT tags for each and every image that you post in your website. The sound of 'tags' might have reminded you of HTML, Yes! It is HTML but not to worry if you don't know HTML. In Blogger there is option when you upload an image which can be used to provided relevant ALT text to the image.

In this article I'm going to show you exactly how to optimise your Blogger images for a better SEO.

1. After you upload an image in your blogger post, select it by clicking on it.

2. Select the Properties option.

3. You will see something like the image shown below.

How To Optimize Blogger Images For Better SEO


The Title Text means the text which people who visit you image and hover their mouse over the image and is also displayed when the image does not load due to slow internet connection and the ALT text is the information which is used by the search engines to know what you image is all about.

Write a brief description of the image in the ALT text text-field. This will boast the SEO score of your website by a huge percentage as image ALT text plays a major role in SEO scores.

 That's it! You have now successfully optimised your website images for a better SEO.

If you have faced any problems during the process described above or any other questions related to blogging, comment down below and I will get back to you.

How To Enable Custom Robots Header Tags In Blogger

How To Enable Custom Robots Header Tags In Blogger


Having custom header tags helps your website or blog get a better attention from the search engine's as it tells the search engine's what to look for in the content and what not to look for. Simply said, having custom header tags boosts your SEO score and helps you rank higher in the search results.

In blogger, there is simple way to enable these custom header tags. In this article i'm going to show you exactly how to enable these header tags in the simplest way possible.

Given below are the exact steps to follow to have your custom header tags ready in Blogger.

1. Go to your blogger blog dashboard.

2. Navigate to Settings.

3. Go to Search preference and find Crawlers and indexing.

4. Under that, find Custom robots header tags, click on Edit.

5. Now, select the checkboxes as shown in the picture below.

How To Enable Custom Robots Header Tags In Blogger


After you're done selecting the checkboxes just hit the Save changes button.

That's it! You have your own custom robot header tags enabled.

If you faced any problems during this process or have any questions regarding blogging, YouTube, making money online then feel free to comment below and I will get back to you.


How To Add Multiple Authors To Blogger Blog

How To Add Multiple Authors To Blogger Blog


Are you having a blog and having a tough time maintaining it alone? Do you want to add more authors to your Blogger blog so that you can get a helping hand in your work? If that's what your looking for then your are in the right place. In this article i'll show you exactly the steps to be followed in order to get multiple authors to your Blogger blog.

There is one prerequisite that you need to have and that is the email ID of the person whom you want to invite as a author to your blog. With that known, let's jump right into inviting people to write in your blog.

1. Open Blogger.com and login with your Google account.

2. Select the blog that you want to add multiple authors to.

3. In the Blogger Dashboard of that blog, go to Settings.

4. Under Settings tab you will find Basic, select it.

5. Now, under Permissions you will find Blog Authors.

6. Click on Add Authors as shown in the picture below.


7. Enter the Email ID/s of the people whom you want to invite to write in your blog.

8. Now click on Invite authors.

That's it! The Email ID/s that you have entered will be sent a mail from Blogger sending them an invitation to contribute to your blog, If they accept that request they will become a part of your blog as a author. There is also an option of promoting these authors as Admin also. This option can be found under the same Blog Authors tab.

If you have any questions related to blogging, making money online, YouTube, then comment your questions down below and i will get back to you.

How To Get Images Popup When Clicked In Blogger

How To Get Images Popup When Clicked In Blogger


If you want to get images pop out in a lightbox when clicked on in blogger then you found the right article. In this article i'll show you exactly what to do in order to get your Blogger post images popup in lightbox when clicked.

For those who don't know what is a lightbox effect, When clicked, your images will open in an overlay on top of your blog. If your post has several images, they will appear as thumbnails along the bottom.

Follow the simple steps as shown below and you will be having your lightbox effect ready. Unlike other websites which show typical code to be added to your blogger template in order to get your pictures pop out, i'm going to show you a method in which you don't even have to write a single line of code. Let's get started.

1. Open Blogger.com and login with your Google account.

2. Now,Select the blog that you want to add the lightbox effect to.

3. Go to Settings tab of your Blogger blog dashboard.

4. Under Settings, find Posts and comments.

5. Find the Showcase images with Lightbox which is under Posts.

6. Click on the drop down right next to it and select Yes.

7. Now, navigate to the top-right corner of your page where you will find Save settings option.

8. Click on it to save the changes you've made.

That's it! You have your lightbox effects ready. Try it out on the images on your blog and comment below you experience with it.

If you have any questions related to blogging, making money online, SEO and YouTube then comment down below and I will get back to you.


How To Submit Your Website or Blog To Google

How To Submit Your Website or Blog To Google


Submitting your website plays a major role in getting your show up in the Google search results. This is your first step for a better search results which means more of free and organic traffic that you get from Google.

In this article i'm going to show you exactly how to get your website or a blog submitted to Google. It is a very simple process which just involves a single click. With that told, let me show you exactly how it is done.

Given below are the steps to follow for you to submit your website or blog to Google to index.


  1. Go to this link www.google.com/webmasters/tools/submit-url
  2. Enter your website's URL in the box provided.
  3. Verify that you are a real human by clicking on the check box which is right next to 'I'm not a robot'.
  4. Now click on 'Submit Request'.
That's it, check after a day and your website will show up in the search results. If your blogging using CMS(Content Management System) platform like Blogger, then you need not worry about submitting your blog to Google as it is automatically done by Google as Google owns Blogger.

If you had any problem submitting the URL of your website to Google then comment your questions down below and I will get back to you.

How To Get Adsence Approved In Less Than a Month

How To Get Google Adsence Approved In Less Than a Month


Every webmasters and bloggers out there wants to monetize their blog or websites with Adsence. The main reason being that it is the highest paying ad network out there and is owned by google, which makes it trustworthy.

In this article I'm going to guide you through the fundamental steps that you need to follow to get your Adsence approved and start making money from your blog or website.

There are many factors that one has to look after in order to get Google AdSense approval, but here is what I followed to get my Adsence approved in less than one month.


1. Content is the king.


As the proverb says content is the king for any website in the internet. So try to get around 20-25 articles before you apply for adsence. But again, quality over quantity is important. Make sure to have original and genuine content on your website or blog and do not have content that is copied from other websites as google will recognize it and your websites might even get banned for copyright issues.


2. Images!


Yes! You read it right! Placing images which are copy written into your website or blog will surly get you into trouble. This is were most of the young bloggers fail.

Do not copy and place the images from other websites into your own website as it will not do any good to you. Your website will be hit with copyright issues and might even get banned from the google search too.

So, try to use as many own images as you can and if that's not possible find the images which are royalty free I.e. Copyright free images. The use of these images in your website will not cause you any legal issues. There are many websites out there like unsplash.com, pixabay.com and many more which provide a ton of royalty free images and also there at websites which have stock images and are paid services.

3. Custom Domain


Having a custom domain serves many purposes like getting your site a level branding and also trust from the users that it is a genuine website. This factor play a major role in getting your Adsence approved but spending a few bucks on buying a domain is defitly worth it as it is a person who will evaluate your Adsence application they will also find the site genuine when you have a custom domain.. So, go grab a custom domain now.

4. Important Pages


Let Google and your users understand your website and what your website collects or asks from its users by providing important pages like 'Terms and Conditions' , 'Privacy Policy', 'Disclaimer'. Also have a 'About' page in your website showcasing the team behind your website or blog, this will help you not only in getting your Adsence approved but also will develop a sense of trust and also develops bonding with your users.

5. SEO Optimized


Having a good SEO score will definitely help your site in getting your adsense approved, so try to optimise your images with Alt tags, write original content with relevant keywords placed in them, but don't over do it as Google will find your post keyword stuffed then your website will be likely to rank lower.

These are the five important and major factors that Adsence application evaluators look for in your website, so go and make the required changes to your website and then apply for Adsence.

If you have any questions regarding blogging or Adsence, feel free to comment down below and I will get back to you!

How To Generate a Sitemap For Your Website or Blog

How To Generate a Sitemap For Your Website or Blog


To boost any websites visibility in the internet the best way to let the search engines know the content on your website so that the website can be ranked higher for the topics that you write about. A complete article explaining the necessity and important of having a sitemap to your website or blog can be found in our article "What Is a Sitemap And Why Is It Important?".

To reduce the effort that all the other webmasters and bloggers take-up to get themselves the best sitemap i have bought you the direct code which you can directly paste it when are were you want to use it.

The default generated sitemap is as follows,


User-agent: Mediapartners-Google 
Disallow: 
User-agent: * 
Disallow: /search
Allow: / 
Sitemap: http://yourwebsite.com/atom.xml?redirect=false&start-index=1&max-results=500
Sitemap: http://yourwebsite.com/feeds/posts/default?orderby=UPDATED


Now, replace "yourwebsite.com" with your own websites URL and that's it. You have your own custom sitemap which is ready to be submitted to the webmasters console of Google, Bing and any other search engines webmasters console.

For a detailed step by step process on how to submit a sitemap to google webmasters go to:
[Link will be updated soon]

If you faced any problems while generating the site map or any other blogging related questions make sure to comment down bellow and I will surly get back to you.

Xiaomi Redmi Note 3 Launched in India, Priced from Rs. 9999

Xiaomi Redmi Note 3 Launched in India, Priced from Rs. 9999


India is Xiaomi's second greatest business sector, and the organization has purchased a superior adaptation of Xiaomi Redmi Note 3 to India today. This cell phone was at first propelled in China a year ago which is Xiaomi's greatest commercial center, this gadget has enormous reaction from the clients of China so they at long last have bought it to India.

The Indian form of Redmi Note 3 accompanies a capable Snapdragon 650 which has a hexa-center configuration with two ARM Cortex-A72 processor centers and four Cortex-A53 centers. The more seasoned variant which was discharged in China a year ago accompanied a MediaTek processor.

There are numerous changes to this adaptation of discharge when contrasted and the China form of discharge, the back camera has been moved up to 16MP sensor with face location with autofocus. Going to the battery, they have moved up to somewhat bigger one 4050 mAh from 4000 mAh.

It comes in Dark Gray, Champagne Gold, and Silver hues and the organization says this item is under 'Make in India' program. And the device also comes with a fingerprint scanner.

The Xiaomi Redmi Note 3 is accessible in two RAM and capacity renditions - the principal variation incorporates 2GB of RAM and is estimated at Rs. 9,999 and 16GB of inbuilt stockpiling, and the other 3GB of RAM and 32GB of inbuilt stockpiling and is evaluated at Rs. 11,999.

The cell phone accompanies a 5MP front camera and a 5.5-crawl full-HD 1080x1920 pixels IPS show and offers 178-degree seeing point. This gadget additionally underpins double 4G SIM cards(Micro + Nano) and the cell phone has an extremely smooth plan and weighs around 164 grams.

What Is Affiliate Marketing and How To Make Money From It?

Affiliate marketing is one of the best ways to make money online quickly. It works on a simple principle - make sales for companies and they pay you a commission (a percentage of the total cost of the product) for every product you sell.

Let me break it up for you into 5 simple points.


  1. Signup for affiliate programs
  2. Get your affiliate links for products that you want to promote.
  3. Promote the product in anyway you are good in communicating.
  4. Make a sale.
  5. Get paid a commision on the actual product cost from the company.


For you to get a better picture, here is a picture that will hopefully will make you understand affiliate marketing in a better way, because a picture speaks a thousand words.


What Is Affiliate Marketing and How To Make Money From It?


That's it! You got it! Affiliate marketing is indeed easy when we talk about the basic working principle of it but it gets complex when it comes to making enough sales so that you can make a decent amount of money from it.

There are many companies that offer affiliate programs which include amazon, ebay, Microsoft and many more. The signup procedure for these affiliate programs is as simple as creating an account in any social media or ecommerce networks.

You can find the link to apply for the affiliate program located mostly at the bottom of the company's website having phrases like "become an affiliate", "Join the affiliate program" etc. Click on that link and complete the signup process by providing the details they ask for.

There are many ways to make sales for making money via affiliate marketing. Some of the best and proven ways are listed below. Check em out and grow your affiliate sales.

1. The Website 


What Is Affiliate Marketing and How To Make Money From It?


As the title says, you need to have a website for this method. Having a niche specific website and writing product reviews and any other related content and encouraging users to buy the product in the end of your review by clicking on the links you provide below will drive more affiliate sales for you and you make more money.

Don't worry if you did not actually use the product and still want to write a review on it. You can find the product will you want to promote and make sales and read the user reviews you can find in the ecommerce site and get you self a clear idea and opinion on the product and then write the review accordingly. Although the best way to write a product review is to use the real products and then writing about it this method also works fine,but don't make it look shabby as you might lose visitors.

2. Mouth to Click


What Is Affiliate Marketing and How To Make Money From It?


Motivating your peers to buy from the ecommerce sites using your affiliate links in what we call as Mouth to Click. This involves a bit of networking and social media presence as you need to manually encourage or force(if needed) people to buy products via your affiliate links. This is quite a straightforward process in which you need to be encouraging your friends and family members to do their online shopping through these affiliate links yours.

If you're as too shy to ask them directly then try the word of social media, send them the your affiliate links in the social media and ask them to buy from those links. The best way for success in this method is telling them what your intention is, tell them that you will get a commision in the sale and the links are not spammy and are from reputed ecommerce websites.

3. The Video

What Is Affiliate Marketing and How To Make Money From It?


Are you good in making videos? Do you upload them to YouTube? Then this is yet another opportunity for you to make a couple of extra bucks from the affiliate program. Wonder how? Read along.

The best way to make money from videos by making sales of certain products is by doing the product reviews. You need to do this product reviews in such a way that users should be convinced to buy the product by the end of the video and then when you provide the link which might be in the description or at the end of the video then users will be likely to click on those links and buy from it.

Make sure to be genuine in your reviews and posses your true opinion on the product. Only in this way you will gain the trust of the users and also drive more affiliate sales though your videos.

Don't worry if your on YouTube and are not doing product reviews, even then your can make money through affiliate marketing. Here's how, where something in the videos you create and tell your viewers to click on the link to  buy yourself the same t-shirt you are wearing.

This helps you in two ways,

1. Makes more affiliate sales and makes you extra income.
2. Develops yourself or your channel a certain level of branding which brings you the kind of recognition you deserve.

Those were the three best possible and most happening ways to make money from affiliate marketing. If you have any kind of questions regarding affiliate marketing then feel free to comment below and I will get back to you.